I’ve
been asked on more than occasion how do I keep up with my blogging. So I’ll let
you in on a little secret. I use Kanban.
Now, you
may find this hard to believe, but I find that Kanban can be used for almost anything.
Kanban is a powerful tool, that helps you see what you need to get done, and
how to control the load, both of which make sure that you get things done, and
deliver value quickly.
So how
do you manage blogging with Kanban?
Well,
when we don’t have a lot to do, and you’ve got stuff to blog about, there’s
usually no problem. But what happens when you want to become a professional
blogger? You need to post far more consistently and of course, give your
readers valuable content. This makes
managing your posts and your time a must, and you need to find your rhythm
- You’ll find you are writing one post, while two others are already being
distributed over the net.
But how
to manage that?
Luckily,
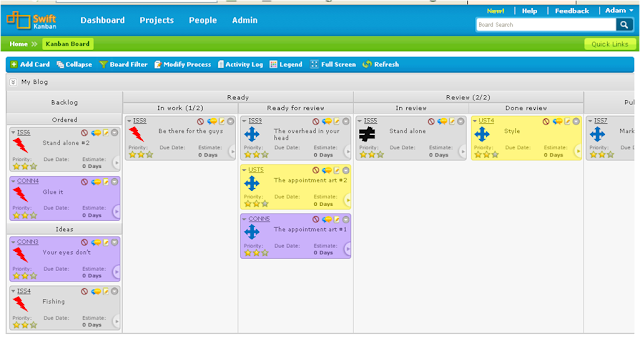
there are plenty of examples. Here’s one blogger who manages his time with
Kanban.
Now, he
isn’t just a blogger. He’s got a family, a day job, and more. He needs to find
the time and the place to try and fit a whole lot of things into his day. Well,
with the Kanban mindset of "getting things done" it becomes ever so
much easier.
Take a
look at the flow above again.
●
It reflects the blogger’s
workflow along with his special needs of publication and distribution.
●
It answers his need to fit
in time for his blog alongside his family, and his day job.
●
It shows you short and
constant time frames, allowing the blogger time to finish his posts and post them,
and adjust to market changes and immediate needs.
The
guidelines (Policies) for this flow take into account the time line, the
amount of writing needed, and market needs.
As in
this example, once you’ve visualized your flow, you can pick a card, and move
it from ‘blog post idea’ to ‘blog post written’, or ‘blog post traffic’. Just
as any other Kanban board, you can see what’s going on, and spot bottlenecks
and specific needs as they happen.
Lets
take a closer look at the board columns:
The
Backlog
As always,
the backlog is your first step. This is where you put all your blog post ideas
as soon as they pop up. You don’t need to prioritize them just yet if you don’t
need to. You can set the top of the list in some kind of an importance order ,
just that you know what’s more or less important for you to get to later on in
the process.
The
backlog consists of two activities. Being a professional blogger, he takes the
time to research his blog posts, and talk to relevant people, join LinkedIn
groups, find Tweets and so on. This way you can keep up to date with the latest
news and developments. Blog post ideas don’t just come by themselves, so this
is a fairly critical stage. Once you have an idea, write down a short
description - ‘just enough’ to remember what you wanted to write about.
Of
course, looking at the flow, work and planning the post is a continuous
effort. This stage just has a very high-level plan. Collect ideas,
copy/paste some links and questions, but don’t get into details. This way you
can quickly create a long list of ideas.
Ready
This
column fleshes out the ideas to posts of 600-1000 words (including images),
each one taking a couple of hours to complete. In this case, our example
blogger doesn’t have an ‘In Progress’ column’, and just places the ideas he
elaborates on higher up the stack.
Now, our
blogger has decided to publish one post a week. But just in case he runs into
problems and can’t write post for a bit, he has a backlog of 3-10 posts he’s
already written. So the limitation of the ‘Ready’ column is at minimum three
posts that he’s written - and those three are also ready for review.
Review
As
you’ve decided to become a professional blogger, all your posts are reviewed by
peers. So this column contains posts that are ready for review. Now, although
there aren’t really limitations on the number of posts you can have here, real
life experience tells us that your peers won’t review more than one or two
posts a week.
Now, as
you want to post once a week, either have a ‘waiting for review’ section in
your ‘Done’ Review column, or add a whole new column for this.
By the
way, the review column also includes corrections = actions that need to be
taken. Once you’ve completed the blog and the review - then you can move the
post to the ‘Done’ column. This is called a policy. a guideline that states
when to move a card from one column to another.
Published
The
actions you need to take to upload the post to your blog.
Distributed
Distribute
the post according to your marketing plan.
Follow
Analyze
your results. Although this is more of an ‘action’, it’s still something you
have to track for each post. If you want to improve, you have to know what
works better in terms of places to publish and distribute, content that works
better, effective blog titles and so on.
Stay
tuned for next week’s part #2 - How to apply this process to your own blog!


No comments:
Post a Comment