October 27, 2012

My three favorites Mind maps tools


After the comments on one of my posts about mind mapping tools, I decided to post about three tools I’ve come across recently, that (to me) are the easiest to pick up and start using.
Now these tools may LOOK fuzzy and cute, but they can change the way you brainstorm your ideas.
So here we go:

1.        Mind Meister


Mindmeister is an online mind mapping tool, with a free basic account.
What I especially loved in this tool is the online demo, when you can simply try out what ever you want. Before you start with your first mind map, the demo explains how to use the different tools all the way through the mind mapping process. It has an excellent interface, it’s easy to use, easy share with others and allows a real brainstorm collaboration.
MindMeister has a basic free version with up to 3 mind maps, and a Pro version.

2.       Text2mindmap 

Text2mindmap is one of the neatest tools I’ve seen, despite the basic and simplistic looks. It’s incredibly easy to convert our text into a mind map without dealing with structural and UI actions.

The mind map is created from a list. You can then move the items around to suit your needs. It doesn’t have lots of bells and whistles, but it’s plenty enough to  brainstorm your ideas.
Tex2mind is free, and doesn’t require a sign up.

3.       Blumind


Blumind is a very simple mind mapping tool, and a good tool for people just beginning to use mind mapping software. The only reason it’s number 3 on the list, is because I prefer online tools, and you need to download and install Blumind to use it.
Blumind has multiple colorful sets, you can expand, collapse and connect nodes, and you can also add icons and notes.
It’s easy to start with. What I really like about it is the ability to add a progress bar, where you can follow your to-do’s in a visual manner.
Free – Download needed – Easy to start – Sign up is not needed

October 20, 2012

Using An Action Map To Make Sense Of The To Do List


What do we do when we have a lot of tasks we need to complete?
We write them down.
So we start writing down the tasks and prioritizing them. But it doesn’t always work. We don’t always get to start really working on those tasks, getting things done.
You know why?
Because you’re not using a few simple tricks which make it so much easier to manage a large number of tasks.

For example, just look at the drawing, and how it became simple.
Visibility is a powerful tool to get things done.

An action map provides both visibility and the simple tool to follow the progress of our tasks easily from a need to do task to a completed one. Especially when we have a lot of them.
An action map is something very common used in agile software development teams to acquire visualization a bit ahead to way things needs to look like. You see , in software development , there is always tons to do, plan, change, test, and so on. When we want to get some high level sense of what comes first and what after (without getting into budget , resources and other nosing details) .. we create an action map (using sticky notes) and  sort them out into phases.

We can use this simple visibility technique for personal objectives too.
With our kids, it’s easier to use the action map to create order out of the tasks they need to deal with. We help them visualize the flow things can go. Visualizing “Now, next, later” is an easy way to think of a flow especially when dealing with kids.

 Visibility works for kids and a basic sense of order and roadmap makes the simplest order we need.
So how do we do it?
Simple.
Use a white board, wall, or window. Create three columns - Now, next and later.
      Set the  goal
      Break it to smaller tasks
      Visualize your goal and tasks on a white task board

For example : Let’s say we have so many things to do in the summer….we want to take a trip to Sea World , re-organize the room , tidy up our wardrobe,  take the dog for his yearly vaccine, clear the shed…

      Place them on a large action map and order them according to your needs.
      When we want to get into getting things done Start doing one thing at a time, and visualize your progress of doing.
It can look like this :


      Every day , consider moving tasks from the bottom to the “now/today” space.
As you can tell we can also set scope on one day only, and pick up tasks for the next day without confusing ourselves with more tasks that are not relevant for that day.

And … don’t forget to have fun

October 13, 2012

How to study for your next exam with Kanban

The best way to plan and execute a project is of course, using Agile. But planning an Agile project, even around the house, is not just about Kanban, it's also about adopting the right way of continuous planning. The GTD (Getting Things Done) approach, and being able to follow through, make conclusions and make changes, based on real life changes.

Let's take studying for exams as an excellent example. 
I still remember the pressure as a student, when you have to prep for several exams together, each one covering a whole semester. I had tons of material to cover – and of course, I was also waiting tables at the time.
It's not easy to study, work, schedule around the exam dates and cover all the material, when you sometimes have to cope with seven exams in a month. In fact, it requires a plan.
As luck would have it, we have this post about Agile to help us plan this out J

1. Create your backlog:

Use continuous planning methods –drill down to the level of detail you need at the righ moment.

” Lets think of the planning process as continuously decomposing a product vision while focusing on those features of greater priority (value) to the business. This decomposition uses just-in-time methods to prevent wasted effort on lower-priority or unneeded features. That is, we expand on features just as much as we need to according to our expectations of when we will build them (this order is determined by the value they provide to the customer).
This plan enables the team to look ahead responsibly so that large-effort activities can be broken down in small enough segments (right-sized work) and balanced against higher priority items that come up. A good release plan provides a clear visual control and obviates the need to look too far ahead and work too far in advance on future, larger features."

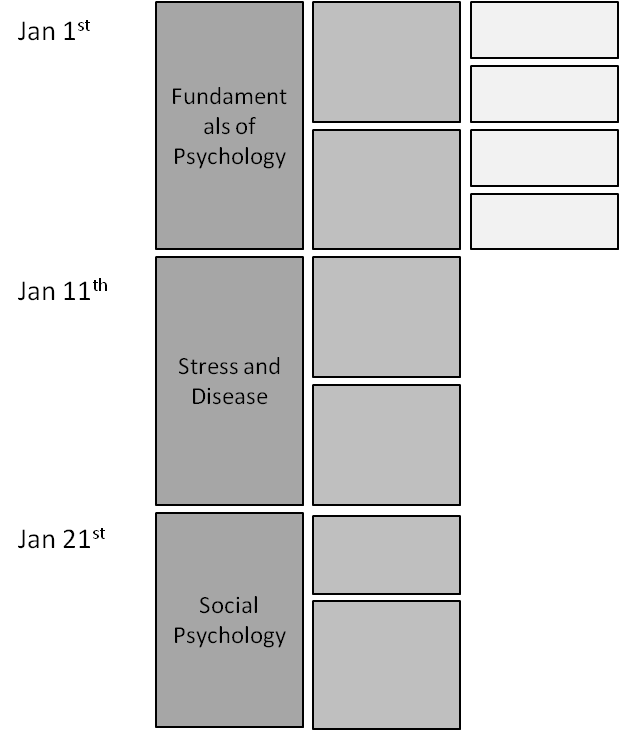
For starters, to cover the studying period, list the courses that you'll be taking exams on. Don’t go into detail yet – look at the first column in the chart below. 


Visualize your courses with different colors.

Visualize your exams timeline.
Order your exams according to their set date. 


Tip: Estimate the effort it will take you to study for the exam using our simple sizing technique.
This action will allow you to visualize your ability to complete those building blocks.


Now that you have your overview, start drilling down into each subject, adding elaboration where needed. Do just what you need, no more. 
(For example, if you were planning a wedding, you'd write down high level tasks (where, when, dress, guest list). You don't start writing down who sites where (or at least, not until you are much closer to the wedding day).)


·         Each course exam is broken down into reasonable study units
·         Some units are broken down further, if required.
·         You don’t have to go into minute detail on all the units – just those you need to at the time. For example, if “Fundamentals of Psychology“ is coming up, I'll break it down into smaller parts, and when I really start studying, I will break it down to even smaller tasks.

Priority level of details settings:  
When you drill down into each exam, decide how detailed you want it to be. Do you really need the details of every sub-subject?


Ready To Go:
These items are what you need to start working on right away, and so have the maximum detail necessary. They have a clear definition of 'done' (For example: pages 1-20 + answer questions 23-56)

Don't add too much detail!
Don't add detail for every task, for every subject, for every exam, right away. When the date approaches – then you can start fleshing things out with more detail.


Work with small items, meaning make sure ready items are in a level of details that is reasonable to achieve. ‘(a day size item may be enough).

Use sticky notes as a good visualization of what we need to study. It also makes sure that you can quickly change, add and adapt to change. (Agile, remember?)

2. In progress: what we actual studying.
·         Pick up items according to priority.
 Learn one topic at a time and move it along the board.
 Work on one item at a time.


3. Done
Follow the Definition Of Done. It’s not done till it’s done.


© Example taken from myagile.co.il.
And don’t forget to have fun while doing it J


October 06, 2012

Kaizen example video, Watch this Video to Learn!

What Does Kaizen and Emptying a Dishwasher Have in Common?


Improving and managing your business opportunities flow with Kanban:


Every freelancer who manages his own business needs to manage his leads.
Yes, we can use Excel - but that’s just a software tool. It’s not a method, or a way of understanding our load, being able to control it and being able to get more efficient. I don’t know about you, but I don’t have any spare time. I have a business to grow, and having a simple tool to help us get more leads is more than just ‘nice to have’.

Luckily, everything can be done with Kanban.

Kanban is more than just a whiteboard with a flow. Kanban is about efficiency. We already know that Kanban is an amazing tool to get things done, but I find that it’s an amazing tool for my business to know where I am, and what steps I need to take next, whether it’s planning, execution or future plans.
Kanban visibility really holds an enormous value. Just by visualizing your flow you’ll see areas where you need to make adjustments, and bottlenecks become visible.

Kanban enables you to easily understand how to control your workload for each step of the flow. After all, it is pretty obvious that we won’t be able to deal with all of the leads, all the time, for all the stages of the workflow. Visualizing the load will help us solve business issues and rethink our flow of work.
Besides the ability to visualize the flow, rules and policies help make the flow efficient. Not theoretical rules - but rules that are adjusted and tailored to our day to day business activities, as shown in the flow.
So how do we do it?

1.       Understanding your workflow: As a business we need to identify the flow of events that generate opportunities from market leads  or make opportunities into money.
In our example it can look like this (with slight changes to the original business)
The following describes the steps taken from the time we have the lead to the time it become an account.


2.       A white task board reflects the flow - each new lead is a sticky note.
Start off simple, and add the leads to the board according to their process stage as tasks/goals.


Now ask yourself:
What are your bottlenecks?
Can you handle the work in each column?
Are there any wastes in the process that we can remove or should plan to remove?
Are we prioritizing correctly?

3.       Classification and visibility enhancement:  Now, start adding details to the flow to suit our visibility needs and the new changes we made to the flow. Classification and enhancements usually come when we start using the board. That’s when we see where we want to make adjustments and change things to what we want them to be.
For example: You might want to add a color for each different type of customer or type of 
opportunity, use different colors assignees or for lead source, add more columns - and so on.


There are a lot of ways to do so - you can read more about Kanban boards here.
4.       Policies management: Decide the rules - when does a lead move from one column to another? When is a lead ‘done’?

5.       Once a day, gather the team around the board, and review it.

Obviously, as time goes by, the board becomes more elaborate as making things visible helped improve the flow.

For further read of Kanban and how to manage and control your work flow :


Kanban tools